Thursday 29 December 2016

Best of 2016


Christmas is over for another year and, with the soundtrack of my very favourite Christmas movie Nativity! still playing in my head, it’s time for a review of 2016. Cheryl from Meadow Mist designs is holding a link up and, thankfully, she has provided a few prompts to follow, so here goes.

MOST POPULAR POST


My post with the most views was a tutorial I wrote on How to Hang a Quilt on an Outdoor Wall. Its popularity is due to it being featured in a newsletter from Debbie at A Quilter’s Table. If you don’t already get this newsletter, I highly recommend it. Debbie is generous in her round-ups and usually features variations of a quilt design that will have you rushing to add it to your already over-long to do list. Back issues are here if you want to see some samples. 

POST WITH THE MOST COMMENTS


The winner in this field was my stop on the 2016 New Quilt Bloggers Hop. Thanks to everyone who took the time to comment on ANY of my posts. I truly appreciate and value every one of them.

THE RUNNER UP


The runner up in both the above categories was my stop in the Cloud 9 New Block Blog Hop. It got a lot of views and a lot of comments. It surprised me that people could see so much potential in it and a lot of the comments had ideas for making it in different colourways. I went on and used a couple of those suggestions to make some placemats just before Christmas. I learned a lot from doing this hop and from seeing what other people did as well. I would definitely like to do it again if I get the chance.

FAVOURITE FINISH


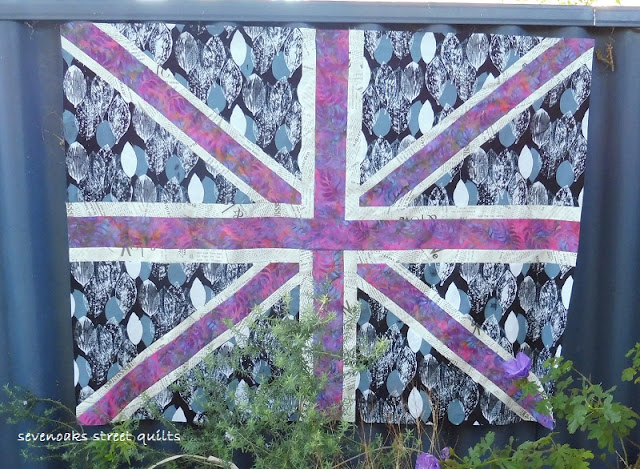
Always a tricky choice. Up until a little while ago that would have gone to the Union Jack quilt I made out of Jane Sassaman florals (here) but I thought maybe I should pick another one since I think I’ve showcased that particular quilt far too many times already. I was scanning through my quilt gallery and, genuinely, this is my new favourite – the Union Jack quilt made from batiks. It’s not finished and extremely similar but I love that large scale leaf batik and that dusky shade of blue of some of the leaves. Shame about the photo spot with its excess of shrubbery though.

FAVOURITE POST


Another difficult choice. There were two posts I really enjoyed writing and they were slightly off topic. One was the One Lovely Blog Award post. I had to come up with seven things about myself and I had to dig a fair way back into my past for something interesting but it was fun and I got some great feedback. The other was a post about my sewing space. One of my fellow 2016NQB hoppers and part of my critique group, Melva at Melva Loves Scraps, ran a link up for posts about our sewing studios and it was great to see everyone’s creative areas.

It will soon be 2017 – stay safe and have a Happy New Year!


Tuesday 20 December 2016

2017 The Plan


2016 was a year of challenges and growth for me in my quilting and blogging and I’m hoping to build on that for next year. Here’s what I’ve got planned so far.

I loved being part of the 2016 New Quilt Bloggers Hop this year and I’m hoping to build on the sense of community I got from that next year. To that end I’ve been accepted into two bees (or not two bees – sorry couldn’t resist J). I’m in Hive 1 for Stash Bee with a whole new bunch of people; and it seems that other members of the 2016NQB didn’t want to let go of the camaraderie either and we have started our own offshoot bee, Bee Inspired for next year. I’m really looking forward to the challenges these are sure to throw at me… I think.

I signed up for the Modern Quilt Guild mini swap and that project is due in February. This is my first ever swap and it’s something I’ve wanted to try for ages.


There has to be a Quilt Along somewhere in the mix and I’m planning on joining the Garden Snail Quilt Along on Instagram. I’ve already confessed my deep abiding love of snails and so this project has my name all over it, plus one block a week is something I can manage.

I’ve got some personal projects planned as well and a lot of them are minis which should make me look like I’ve accomplished a lot by this time next year. I’ve been doing a bit of designing on a doodle type scale of late and I want to make a few of them up so that’s what a lot of them will be.

I hesitate to put this down but (deep breath) I intend to open my own Craftsy shop. In my more confident moments I think there should be nothing to doing this. Still… a big step.

I’ve got a blogging routine going where I post about once a fortnight and that gives me enough time to play around with other things and is regular so the blog doesn’t get neglected. I’ve been hanging around the edges of Instagram for the last two years. This year I think I’m going to post more frequently there. They tell me it’s the platform of the quilting future present so I guess I should embrace it.

And if you’re posting on Instagram then you need a few photography skills and hopefully I’ll improve on that frontier as the year progresses as well. I recently discovered a blog which might interest a few of you, iPhone Photography School Blog. Who knew you could do all those things?


And that’s the list for now. I’m linking up with Yvonne at Quilting Jetgirl for her prizes ;-).

I hope you all have a very Merry Christmas!

Wednesday 7 December 2016

Facets Plus - Finished!


If you’ve been following the progress of this quilt looking at these photos is probably giving you a sense of deja-vu. But that’s what happens when you’re participating in a quilt-along, this one hosted by Amanda at This Mom Quilts.


Finally it is finished and happily installed on the spare room bed and it’s time for the celebratory happy dance.


And the final stages went really well. Even though I was anxious about the thought of quilting this it was smooth sailing. And speaking of smooth, the back is pucker-free as well – a first for me. I put it down to trying a different basting technique that I found on Campbell Soup Diary. I’m lucky enough to have a fairly large table in my sewing space and using clamps to keep the layers smooth worked a treat! I may also have basted more densely than in the past. All techniques I will use again.


Not having a pet to photogenically loll on my quilts I decided to use this very cute toy donkey. Originally he was named (by the toy company) ‘Dopey Donkey’ and came with a backpack full of tiny books with stories about how stupid he was. I thought this was very unkind so promptly binned them even though the backpack idea was kinda cute. Now, of course, he has no name such is the depth of my lack of imagination. If you’ve got any suggestions let me know.

Stats
Finished size is 70” by 80”.
You can find the pattern here


Wednesday 23 November 2016

Snowflake Swirl Placemats


Remember the Cloud 9 New Quilt Block Blog Hop? Ever since then I’ve had the idea of trying out some different colour combinations, especially after the many suggestions put forward in the comments. With the upcoming entertaining season almost upon us what could be more perfect than a couple of sets of placemats? Not much! So here they are first in the classic red and white scheme so perfect for Christmas.


I’ve gone all out for my photo styling this time, splurging on a few shiny baubles and raiding the garden for some sprigs of rosemary. If you can imagine Christmas carols playing in the background then the whole scene has been set.


I spiral quilted all of these as you can see. The trouble with echo quilting is any flat spots are repeated in every round, nonetheless it’s effective and to the untrained eye of your guests it should go unnoticed, especially once they’ve got a plate full of food in front of them and a glass of your special Christmas champagne cocktail in their hand.


And there’s a blue and teal version for any other time, styled with a bit of dessert (thanks, don’t mind if I do!).


It’s surprising how many mini meringues and blueberries you can fit into an antipasto dish. Just add a generous dollop of double cream - delicious!

Stats

Finished size is 14” x 18”.
You can find the block tutorial here
Baubles were just a few dollars from Kmart (Australia).
The idea of rosemary as a table ornamentation for Christmas came from many places on the internet when I was searching for styling ideas for holiday table settings. There are even tutorials for making simple mini rosemary wreaths (long supple sprig tied so it forms a circle) if you’ve got the time (one here).


Wednesday 9 November 2016

Black Jack – a finished flimsy


I’ve adapted the Double Fat Jack tutorial over at Lily’s Quilts again . This time it was doubled (original cutting sizes minus ½” multiply by 2 and add ½”) to make a quilt that finishes up at 44 x 58 inches


I used two batiks along with a newsprint fabric from my stash (yay!) to make this version (see the others here). 


Summer is definitely on its way – the days are longer and we had our first scorcher on Saturday. Here in Western Australia we don’t have Daylight Saving so mornings are perfect for a pyjama-clad photo shoot in the backyard. Or anywhere else for that matter, since it appears wearing pyjama tops is a current fashion trend, just not teamed with slippers and pillow hair.


Later that day I took it out for a shaded lunchtime photo shoot, carefully hanging it on a brick wall. It looked perfect! And then I realised I hadn’t brought my camera or phone… dammit… I threw a minor tantrum and didn’t go back for another try.

Friday 28 October 2016

Paying It Forward - a giveaway with strings attached


This week the lovely Abigail from Cut & Alter sent me a Pay it Forward Craft gift in the mail. Back in June my name was picked as being the lucky recipient and Abigail promised me something in the mail before Christmas, so it was something of a surprise when it arrived.


Now it’s my turn to Pay it Forward. I need to pick 3 people to send a little (postage costs from Australia being what they are) something to. If you would like to be the recipient and are willing to then pay it forward to 3 other people in your turn leave a comment below. Make sure I can contact you. If you are a no-reply commenter please add your Instagram handle or email address.

I’ll be giving other opportunities over on Instagram as well so if you’d like to give yourself extra chances leave a comment over there as well.

I’ll randomly pick the winners next Friday lunchtime Perth time and I’ll be in touch. Good luck!


Friday 21 October 2016

Five Things Friday #5

It’s been a really good week this week!


First up, I went to the rose nursery and bought some more roses. So, I had 109 and with these new ones the count is now up to 114. Here’s one of them, the absolutely divine Julia’s Rose.


There’s nothing better than coming home from work and finding some happy mail on the doorstep. This is the giveaway I won from This Mom Quilts a few weeks back. It’s a lovely haul of low volume fabric (including some blueberry park that I’ve been drooling over); some ribbon to bring my gift styling up another notch; a pencil case; some hexie templates and a needle keeper. Thanks Amanda, too generous!


I signed up for the Modern Quilt Guild mini swap and received an email with my partner info on Wednesday. 


One of the suggestions was to make a collage for inspiration for our swap mate. This is mine, clockwise from top left the makers are Libs Elliott, Cynthia from Ahhh Quilting, Wendy from Quiltamour and Svetlana from sotak handmade.


Don’t you just love the way plants will grow in any crack available. This is the lovely delicate looking Australian Native Violet.


Linking up with Amanda at Gypsy Moon Quilt Co for Five Things Friday.

Have a great weekend!

Friday 14 October 2016

Five Things Friday #4


It’s been a while since I posted a 5 Happy Things list. This is what has been making me smile of late.


It’s spring here and plants are coming back to life. There’s an amazing rampant “green” smell in my backyard at this time of year. Breathe deep - it must be healthy!


Picking up a book at the library can be tricky and I’m sure we’ve all had our share of disappointments so it’s always a bonus when you pick up a good one. This is light-hearted and fun, for the most part. It’s kind of Mary Poppins goes modern and adult (ahem) which probably explains the upside down umbrella on the cover.


I ordered some labels from Australian business Labels and Ribbon so all my lousy label days are behind me. The cheap option doesn’t allow you to add your own logo but there are lots of different fonts to choose from and various designs for the little picture in the corner.


More quilt books from the library. I went through the catalogue of what was available, picked out quite a few and saved them into a list. I was tempted to reserve them all at once but, no, I thought it through for a minute and picked out a couple at a time.


And lastly this fabric which can only be described as high visibility green. I found it at a local fabric and manchester franchise, Textile Traders. They were having a sale, one day only, printed ‘craft’ fabric, $7 per metre! This is such a bargain! Unless you’ve ever fabric shopped in Australia you have no idea, but just for comparison my Local Quilt Stores are selling Kona solids for $20 per metre. I hot footed over there at very least out of curiosity and checked it out. They don’t have a big range but what they do have is current and good quality (in store anyway) and I was extremely tempted but I don’t need any more prints… I hate leaving empty handed don’t you? So I bought some Quilters Cotton solids that I need for upcoming projects and this piece found its way in due to a wave of FOMO which struck as I was leaving. What if I wanted it for something and I couldn’t find it again? Tragic! The bonus was that being the type of store it is they are very generous with their cuts. They measure a little more before they start and add a little more to the end. Happy days!

Linking up with Amanda at Gypsy Moon Quilt Co for Five Things Friday.


Have a great weekend!

Friday 30 September 2016

Facets Plus QAL – the top is FINISHED!


My Facets Plus quilt top is finished! For those of you who haven’t been following its progress, this is the quilt I’m making to participate in the Facets Plus Quilt Along hosted by Amanda over at This Mom Quilts. I’ve adapted the pattern slightly while keeping the same block design.


Did I tell you I was going to make it big enough to fit my king single bed in the spare room? This is the biggest quilt I’ve made so far finishing up at 70” by 80”. Whew! I was originally going to add borders but in the end I went with extra blocks to increase the size and I’m happy that I did.


Today’s photos are taken at my place; since it’s so large I had to stand on a teetering crate to stick it to the wall and that means convenience reigns when choosing a photo location.


Here in Australia it is the beginning of spring and the quilt makes a superb backdrop to the peach and plum blossom. I kind of wish it was there all the time.


I’m not looking forward to quilting it – keeping it simple will work best I think. I might just take a breather and whip up a couple of smaller more manageable pieces before I start in on that long and arduous journey... or is that the wrong attitude?


Tuesday 20 September 2016

Bloggers Quilt Festival: Long Tall Jack

This is my second entry into Bloggers Quilt Festival. Made with the beautiful Jane Sassaman fabric ‘Prairie Chic Meadow Mix’ in indigo, this is my upscaled version of Lyn at Lily’s Quilts Double Fat Jack quilt tutorial.


It measures up at 54" x 70". This is one of my all-time favourite quilts.


And here’s the back. The post explaining how that was put together is here.

For more details along with a second one I made see the original post here.

Linking up with Bloggers Quilt Festival at.Amy’s Creative Side

Bloggers Quilt Festival: Somewhat Positive

This is my first ever time for participating in the Bloggers Quilt Festival and I couldn’t be more excited! My top entry pick is this Somewhat Positive mini. It was designed by me and finishes up at 24 inches square.


The original post is here.


 Many thanks to Amy for hosting this event. 
Linking in with Amy’s Creative Side for Bloggers Quilt Festival.

Tuesday 13 September 2016

Cloud 9 New Block Blog Hop


Hello, I’m Sue and welcome to my stop on the Cloud 9 New Block Blog Hop. If this is your first visit please feel free to look around.


This is the block. It's 12" square finished.

I adapted it from a snowflake design on the pyjamas I was wearing on the night the chance of joining this hop was offered to the 2016 New Quilt Bloggers Facebook group. Just as well inspiration struck so early otherwise I may have had a sleepless night or 30…


This is my first ever tutorial, hope it’s clear. If not, let me know, I’ll treat it as constructive criticism, I promise.

SNOWFLAKE SWIRL BLOCK

This block construction is a hybrid between regular piecing and paper foundation piecing. Really, it is mostly a guide to keep everything lined up and if you’ve never done paper piecing before it is a super easy way to start. To make this block you’ll need 4 copies of the piecing template here (please excuse the fact that it is hand-drawn, I couldn't get the circular effect without drawing it). Print it off with page scaling on your printer settings at NONE.

I’ve been generous with the cutting. I like plenty of room to manoeuvre with this technique.
I’ll be pressing all seams as I go, you have my permission to do what you usually do in regards to pressing.

When paper piecing use a smaller stitch length than usual to make it easier to remove the paper at the end. I set mine at 1.6.

If you have never tried foundation piecing there are many tutorials available on the web in the format of your choice.  

CUTTING INSTRUCTIONS

Cut 4 x 7 ½” squares from the background fabric (Shadow), then cut on the diagonal to yield 8 HSTs.

BLOCK A

Cut a 8 ½” x  5 ½" piece light blue fabric (Sky)
Cut a 8 ½” x  1” piece dark blue fabric (Amazon)
Cut a 8 ½” x  ¾ ” and  a 8 ½” x 4” piece background fabric (Shadow)

BLOCK B

Cut a 4 ½” x  5 ½” piece lilac fabric (Lilac)
Cut a 4 ½” x  1” piece purple fabric (Iris)
Cut a 4 ½” x  ¾ ” and  a 4 ½” x 2” piece background fabric (Shadow)

BLOCK C
Cut a 2 ½” x  10” piece lilac fabric (Lilac)
Cut 2 x 2 ½” x  1” pieces purple fabric (Iris)
Cut 2 x 2 ½” x  ¾ ” and  2 x 2 ½” x 2” piece grey fabric (Shadow)

PUTTING IT TOGETHER

We’re going to start by making the snowflake arms. Block A makes up the diagonal arms and Blocks B and C make up the cross bar arms.

NOTE:  you will need to use a scant ¼” seam allowance when piecing the arms

BLOCK A

Sew the 8 ½” x 4"piece background fabric to the 8 ½” x  1” piece dark blue fabric and the 8 ½” x  5 ½" piece light blue fabric to the 8 ½” x  ¾” piece background fabric. Sew the two sections together (see diagram below). Trim the side edges if required to tidy it up then cut into 4 x approximately 2” strips.

BLOCK B

Sew the 4 ½” x 2” piece background fabric to the 4 ½” x  10” piece purple fabric and the 4 ½” x  5 ½” piece lilac fabric to the 4 ½” x  ¾” piece background fabric. Sew the two sections together (see photo below). Trim the side edges if required to tidy it up then cut into 2 x approximately 2” strips

BLOCK C

Sew the 2 ½” x ¾” pieces background fabric to either end of the 2 ½” x  10” piece lilac fabric and the 2 ½” x  1” pieces purple fabric to the 2 ½” x  2” pieces background fabric. Sew the three sections together (see photo below). Trim the side edges if required to tidy it up.


TEMPLATE SECTIONS

Lay a hst on the template, lining the diagonal edge from corner to corner.


Lay a Block A strip along the diagonal edge lining up the marks on the template with the seams along the strips. It doesn’t have to be accurate, they are a guide to create a circular effect. Stitch along the seam line and press. Fold the template back along the second seam line and trim a ¼” from the edge of the paper.


Line the second hst piece with the edge of the strip and stitch along the seam line. Press and trim the block to the edge of the template.

PUTTING THE BLOCK TOGETHER

Lay the 4 sections out so the arms are swirling in a circular kind of way


Stitch a Block B strip to two of the templates (one from the top, one from the bottom) using the marks as a guide to line the seams on the strip up. Again they’re more of a suggestion than an order. Press and trim the top and bottom edges then READ THE NEXT SECTION CAREFULLY. Trim the strip ½” from the edge of the template, yes that is half an inch from the template edge not the seam line.


Line the other template sections up aligning the square edges and stitch along the seam line

Stitch the Block C strip to the edge of one of your pieced sections, using the marks as a guide. Press and trim the edges, then once again trim the strip ½” from the edge of the template. Line the two sections up and stitch along the seam line. Press and trim.
Remove the paper and admire

At this point I would like to say thankyou to Cloud 9 for giving us the opportunity to work with their fabrics and to hosts Yvonne, Cheryl and Stephanie for organising the hop.

Today’s section of the hop is being hosted by Cheryl at Meadow Mist Designs. There is a big list of bloggers to visit today with no shortage of talent. Check them out. And wait there's more! See the links for yesterday's stage of the hop here and tomorrow's here.